Firewall Analyzer provides two more external authentication apart from the local authentication. They are Active Directory authentication and Remote Authentication Dial-in User Service (RADIUS) authentication. If you import users from Active Directory or if you add a RADIUS server details, you will find the Log on to field below the Password field in the Firewall Analyzer Client UI Login screen. The Log on to field will list the following options:
Local Authentication - If the user details are available in local Firewall Analyzer server user database
Radius Authentication - If the user details are available in RADIUS server and dummy user entry should be available in local Firewall Analyzer server user database
Domain Name(s) - If the details of the user of a domain is imported from Active Directory into the local Firewall Analyzer server user database
Enter the User Name and Password. Select one of the three options in Log on to (Local Authentication or Radius Authentication or Domain Name). Click Login button to log in to Firewall Analyzer Client UI.
Active Directory Configuration Settings
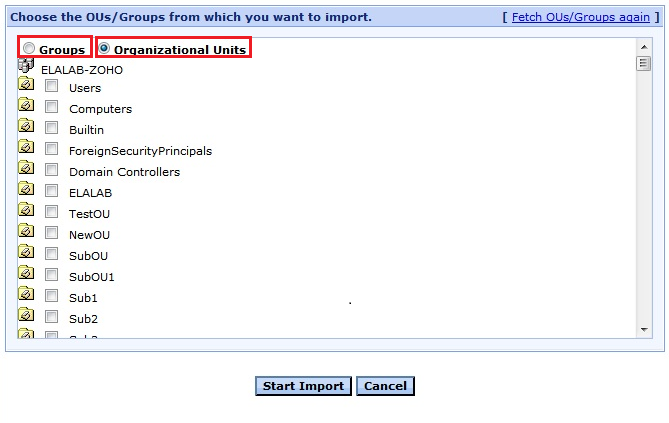
Users in the AD (Active Directory) can be imported into Firewall Analyzer server. You have to select the required OUs (Organizational Units) under the Listed domains. You can re scan the network to find domains. Login to individual servers of the domain to get the OUs listed and select the OUs as per your requirement. Use the server credentials (User Name & Password) to login to the server. For the first time, all the users will be imported into Firewall Analyzer. On subsequent or periodic imports, only the new user added to the AD will be imported.
Users present in any hierarchy level of Active Directory can be imported including users inside group level hierarchy. Instead of importing the entire domain forest, you can import the particular OU, user group, users by specifing in the text box, because, displaying UI for selecting OUs itself takes a lot of time.
The imported users will be added in the Firewall Analyzer server with the following constraints:
Access Level as Operator and will have access to all the Firewall devices.
Procedure to configure AD settings
Click the External Authentication Settings link under the Settings tab to configure the AD user details import, periodic import, and to enable user authentication usage. On clicking the Active Directory tab, the Active Directory Configurations page opens up. In that page, you will find the following sections:
In this section, you will find Import Users button. Click the button and Import users from Active Directory screen pops-up.
In that screen, you will find the following items:
Domain Name combo box & Rescan Network link
Domain Name combo box will list all the available domains in the network. Below the combo box, you will find the Rescan Network link. Clicking the link will re scan the network to find out all the available domains. Select the domain from the combo box as per requirement. Besides the combo box, you will find the Add New icon and link. Clicking the icon/link will re scan the network to find out all the available domains. Select the domain from the combo box as per requirement.
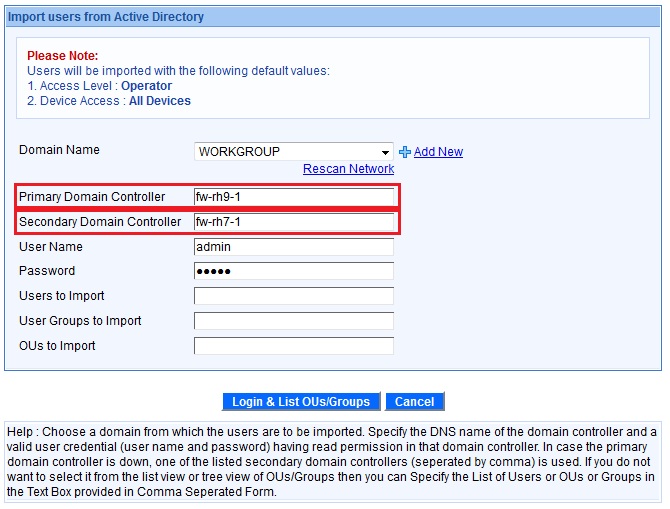
Primary Domain Controller
If you want to import the users from the Active Directory of a Primary Domain Controller server, enter the server name in the text box.
Secondary Domain Controller
If primary domain controller is not available, Firewall Analyzer will try to import users from secondary domain controller. If you want to import the users from the Active Directory of a Secondary Domain Controller server, enter the server name in the text box. You can enter multiple secondary domain controllers separated by comma. If you enter more than one secondary domain controller, Firewall Analyzer will try to import the users from the first secondary domain controller, if it is not available it will try the next domain controller in the given order.
User Name
Password
If you want to access a domain controller and get list of User Groups or Organizational Units (OUs), enter the valid user credentials (user name and password) of the domain controller in the text boxes.
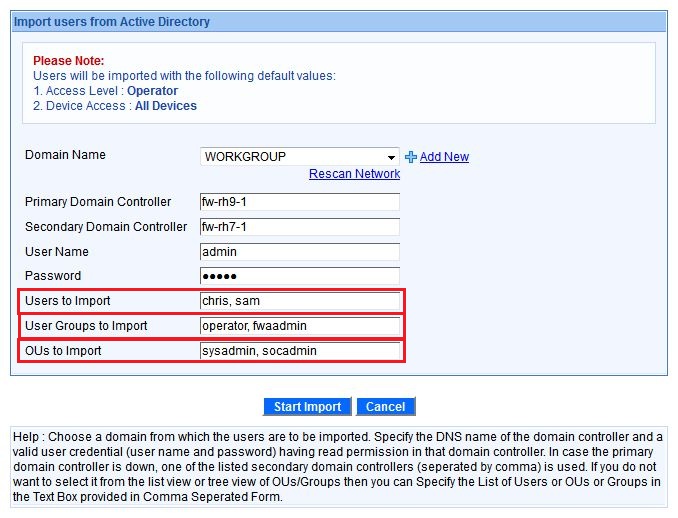
Users to Import
If you want to import individual users, enter the user names in the text box. Enter multiple user names separated by comma.
User Groups to Import
If you want to import users belonging to a particular group, enter the user group name in the text box. Enter multiple user group names separated by comma.
OUs to Import
If you want to import users belonging to a particular OU, enter the OU name in the text box. Enter multiple OU names separated by comma.
After entering the server name to be accessed and the credentials for server access, click the Login & List OUs/ Groups button to get the list of (Organizational Units) OUs. If you want to cancel the access to server and get list of OUs operation canceled, click the Cancel button.
Choose a domain from which the users are to be imported. Specify the DNS name of the domain controller and a valid user credential (user name and password) having read permission in that domain controller. In case the primary domain controller is down, one of the listed secondary domain controllers (seperated by comma) is used. If you do not want to select it from the list view or tree view of OUs/Groups then you can Specify the List of Users or OUs or Groups in the Text Box provided in Comma Seperated Form.
Schedule
In this section, you will find a check box to schedule the import of users periodically from AD and a Save button.
every __ days" check box. Enter the periodicity of user import in days.
Click Save button to save the changes.
Authentication
In this section, you will find the status (Status: Disabled) of the AD authentication to be used for users imported from AD. On importing users from one or more domain, the status will change to Enabled (Status: Enabled).
Set Active Directory as Default Login Authentication
The Active Directory authentication can be set as default for login. Select the 'Set As Default Login Authentication' check box to enable this feature. This option will appear only one AD domain users are imported. If users of more than one domain is imported, this option will not appear. When 'Set As Default Login Authentication' check box is selected, the login screen will show the default authentication option as '<AD Domain Name>'.
RADIUS Server Configuration Settings
You can also leverage the RADIUS authentication for user access bypassing the local authentication provided by Firewall Analyzer.
In the RADIUS server authentication the users credentials are sent to the RADIUS server. The server checks for the user credentials and sends the authentication successful message to Firewall Analyzer server.
Note: If the user has only RADIUS server authentication, create the user in Firewall Analyzer with dummy password. On user logging in with RADIUS server authentication, the dummy password in the local server is ignored and the user credentials are sent to RADIUS server for authentication. Refer the procedure given in the Adding Users document to add a new user with dummy password.
You can make Firewall Analyzer work with RADIUS server in your environment. This section explains the configurations involved in integrating RADIUS server with Firewall Analyzer.
Procedure to configure RADIUS server settings
To configure RADIUS server in Firewall Analyzer, provide the following basic details about RADIUS server and credentials to establish connection:
Click the External Authentication Settings link under the Settings tab to configure the RADIUS server configuration. On clicking the Radius Server tab, the configuration fields are displayed. In that page, you will find the following fields:
RADIUS Server Settings
Description
Radius Server IP
The IP Address of the machine in which the RADIUS server is running. Enter the IP address of the host where RADIUS server is running
Radius Server Authentication Port
The port used by the RADIUS server for authenticating users. Enter the port used for RADIUS server authentication. By default, RADIUS has been assigned the UDP port 1812 for RADIUS Authentication.
Radius Server Protocol
The protocol used by the RADIUS server for authenticating users.
Select the protocol that is used to authenticate users. Choose from four protocols:
PAP - Password Authentication Protocol
CHAP - Challenge-Handshake Authentication Protocol
MSCHAP - Microsoft Challenge-Handshake Authentication Protocol
MSCHAP2 - Version 2 of Microsoft Challenge-Handshake Authentication Protocol
Radius Server Secret
The secret string used for connecting RADIUS client (Firewall Analyzer) with the server. Enter the RADIUS secret used by the server for authentication
Authentication Retries
The number of retries the RADIUS server to permit for authenticating users. Select the number of times you wish to retry authentication in the event of an authentication failure
Set RADIUS server as Default Login Authentication
The RADIUS server authentication can be set as default for login. Select the 'Set As Default Login Authentication' check box to enable this feature. When selected the login screen will show the default authentication option as 'Radius Authentication'.