Help
Firewall Analyzer supports most versions of NetScreen Firewall Appliance (OS 3.x, 4.x, 5.x,...). You can either enable WELF or Syslog format.
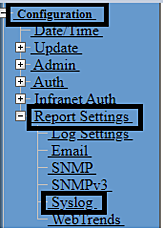
To configure Syslog, perform the following steps:
|
Note: |
From the 'Source interface' drop-down menu, select the interface from which syslog packets are sent. |
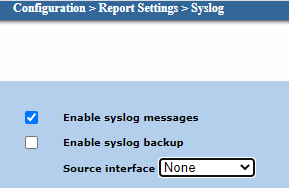
- Enable: Select this option to enable the syslog server.
- IP/ Hostname: The IP address of the syslog host.
- Port: The port to which the security device sends syslog messages. The default port is UDP 514.
- Security Facility: The security facility, which classifies and sends security specific messages to the syslog host.
- Facility: The regular facility, which classifies and sends all other messages for events unrelated to security.
- Event Log: Select this option to send event log entries to the syslog host.
- Traffic Log: Select this option to send traffic log entries to the syslog host.
- TCP: Select this option to use TCP as the transport protocol for communication between the device and syslog server. By default UDP is used. Before selecting TCP option, consult KB14982 - Device May Become Unmanageable after Enabling TCP Syslog
For this example, 192.168.1.2 has been used as the Syslog Host Name. It is recommended to leave the Syslog port as the default value (514):


|
Note: |
In certain versions of NetScreen firewall there is an option to record the completion of a transaction. Please select this option (if available) in the NetScreen firewall to enable Firewall Analyzer to measure the sent and received bytes from the firewall traffic logs. |
|
Caution: |
Uncheck the TCP option. This will make the firewall to send syslogs in the configured UDP port. |
If you would like to send NetScreen logs in WELF to Firewall Analyzer, the you need to Disable Syslog Messages and Enable WebTrends Messages in the above steps. For more information, refer the NetScreen documentation.
Execute the following commands to configure syslog via CLI:
set syslog config 192.168.1.2

set syslog config 192.168.1.2 facilities local0 local0

set syslog config 192.168.1.2 log traffic

set syslog src-interface <<interface name>>

set syslog enable
NOTE: The difference between “security facility” and “facility” is that “security facility” is specific for logging of security related events. Facility logs all other events.
Execute the following commands to configure WebTrends via CLI:
| Syngress > set webtrends host-name 10.23.23.2 Syngress > set webtrends port 514 Syngress > set webtrends enable |
Using CLI Console:
To add a new SNMP community: (Skip this step, if you have already defined a community)
| set snmp community "<community name>" Read-Only Trap-off version {any | v1 | v2c} |
To enable the SNMP Manager running in Firewall Analyzer to make queries to SNMP Agent running in the firewall:
| set snmp host "<community name>" <Firewall Analyzer IP> [src-interface <interface through which Firewall Analyzer is connected>] |
Example: The following command example defines the IP address '10.5.1.24' as member of the SNMP community named 'olympia':
| set snmp host "olympia" 10.5.1.24 [src-interface inside] |
Enable SNMP manageability on the interface through which the SNMP manager in Firewall Analyzer communicates with the SNMP agent in the NetScreen device.
| set interface <interface name> manage snmp |
Using Web UI:
To add a new SNMP community: (Skip this step, if you have already defined a community)
To enable the SNMP Manager running in Firewall Analyzer to make queries to SNMP Agent running in the firewall:
Enable SNMP manageability on the interface through which the SNMP manager in Firewall Analyzer, communicates with the SNMP agent in the NetScreen device.